SOFTWARE SETTINGS and USEFUL SETUP INFORMATION

I keep this information for my own reference, but if it assists you then I'm glad I could help.

Settings for FT-857D/450/847/950/991A/1000MP/2000

Last update 29 Feb 2024

Using Two Radio's with WSJT-X

>
  1. To save editing WSJT-X settings when changing radio's, create two batch files, one for each radio.
  2. If full installation of WSJT-X and JTAlert is already in use, this can be ignored after this.
  3. The two radio's I use are the FT2000 and the FTDX101MP.
  4. Using notepad, create a batch file called WSJTX FT2000.BAT and add these two lines...
  5. wsjtx --rig-name=FT2000
  6. exit
  7. Save the file to the desktop.
  8. Using notepad, create a batch file called WSJTX FTDX101.BAT
  9. wsjtx --rig-name=FTDX101
  10. exit
  11. Save the file to the desktop.
  12. Double click on the FT2000 batch file and when WSJT-X opens, complete the settings setup as they will be blank.
  13. Test the radio works with JTAlert.
  14. Close off program when done, and Do the same with the 2nd batch file. You cannot use both at the same time if using JTAlert.
  15. The WSJT-X program creates two folders under c:\Users\{your user name}\AppData\Local\WSJT-X FT2000 and WSJT-X FTDX101.
  16. All .adi .txt and log files are stored in the relevant folder for each radio.

Yaesu FT-950 setup with WSJT-X

>
  1. Use 38400 data rate. Change from default of 4800 to 38400 in Menu 26.
  2. Menu 27 may need changing to 100 or 1000 if drop outs are experienced.
  3. WSJT-X Settings - CAT Control (under Radio Tab) (Note. Your COM port may be a different Nr)
  4. Serial Port = COM1. Baud Rate = 38400. Data Bits = Eight. Stop = 1. Handshake = Hardware.
  5. Force Control Lines are left blank. PTT Method = CAT. Mode = Data/Pkt. Split Op = None.
  6. Check menu items 50 51 and 52 for adjustment levels. Set VOX Menu 114 to dAtA.

Program settings - HRD, N1MM, OMNIRIG, ETC

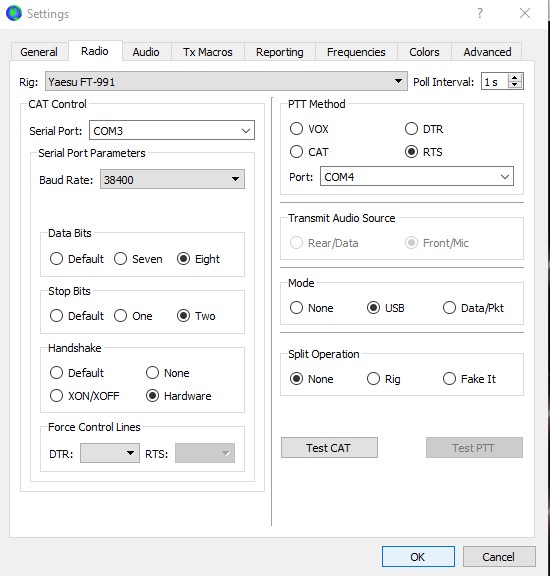
Remember to substitute your com port number - it could be different.

Software Radio Configuration
Ham Radio Deluxe FT857D FT450 FT847 FT950 FT1000MP FT2000 ICOM
IC-910
Bits per second 4800 38400 9600 38400 4800 38400 19200
Data Bits 8 8 8 8 8 8 8
Parity None None None None None None None
Stop bits 2 1 (yes, 1) although the default is 2. 2 might work 4 u instead. 2 1 2 2 1
Flow Control None None None       None
RTS Tick box Tick box No Tick Tick box Tick box Tick box No Tick
DTR No Tick No Tick No Tick No Tick No Tick No Tick Tick box
               
N1MM Logger
(XP Pro)
FT857D FT450 FT847 FT950 FT1000MP FT2000  
Baud Rate 4800 38400 9600 38400 4800 38400  
Parity None None None None None None  
Date Bits 8 8 8 8 8 8  
Stop Bits 2 1 (try 2 if 1 not work) 2 1 2 2  
DTR Always On Off Off Off Off Off  
RTS Always Off On Off On On Off  
Radio / VFO 1 1 1 1 1 1  
(Vista) Right click on Icon / Properties / Compatability* Compatability Mode* Disable Display scaling on high DPI* Run as Administrator DTR & RTS Always on.       For N1MM FT1000 DVS keyer setup - see below. Suits all operating systems.    
               
N1MM CW keyer setup              
Tick CW/PTT on COM port & click set              
DTR
(Pin4)
CW CW CW CW CW CW
(Port Adr: 2F0)
 
RTS
(Pin 7)
Always Off ON ON ON ON Off  
               
OmniRig FT857D FT450 FT847 FT950 FT1000MP FT2000 IC-910
Baud Rate 4800 38400 9600 38400 4800 38400 19200
Data Bits 8 8 8 8 8 8 8
Parity None None None None None None None
Stop Bits 1 for XP. 2 for Vista 2 2 1 2 2 1
DTR Low Low Low Low High Low High
RTS High High Low High High High Low
              Tick both buttons when starting omnirig using VKCL
FTBASIC MMO   FT2000 Utilities Ver 3.4.0
(Memory Management) FT857D   FT847   Disable CAT RTS in Menu 30 FT2000  
COM 1   3   Speed = 38400  
DTR N   N   RS232 = 1  
RTS Y   N   data, parity, stop 8,n,2  
          Echo Off  
          Protocol Non  

Kenwood TS570 With Omni Rig = 38000,8,n,1 | DTR = High | RTS = High

Yaesu FT450D Data modes.. FT8 setup = 38000,8,n,2 | XON/XOFF | DTR = Off | RTS = High | PTT = CAT | DATA/PKT | No Split |

FSK RTTY with the SO2R Box

Note: Both FSK control lines require the use of a keying interface to operate FSK RTTY.

  1. The assumption is made that the SO2R Box is working correctly on CW before you attempt to set it up for RTTY.
  2. You are directed to the N1MM Logger documentation on how to install MMTTY for SO2R Operation in general.
  3. Open N1MM Logger. If you have any Digital Interfaces open, close them.
  4. Close N1MM Logger, the SO2R Box Interface or Utility, and MMTTY.
  5. Make a cable using a DB25 male connector. Pin 22 is the FSK TxD line for Radio 1, Pin 23 is the FSK TxD line for Radio 2, and Pin 9 is the return for both radios. The connectors on the other ends of the cable will depend on your radios and/or interfaces. (I could not get the SO2R box to work via the DB25 port, so I designed the circuit below).
  6. Install the provided EXTFSK.dll into the subdirectories of both MMTTY instances in your computer.
  7. Open the SO2R Box Utility. Put a check mark where it says “Enable RTTY”. Close the SO2R Box Utility.
  8. Open N1MM Logger. Open the Digital Interface for Radio 1. On the RTTY Engine 1 waterfall display, click on “option” then “Setup” Go to the Tx Tab, and change the port to “Extfsk”. Then go to the “MISC”tab and choose ComTxD(FSK). Click OK, and a pop-up screen will ask you for the radio number, and choose Radio 1. Also, uncheck the box that says “Ask every time”.
  9. Now open the Digital Interface for Radio 2. On the RTTY Engine 2 waterfall display, click on “option” then “Setup”, go to the Tx Tab, and change the port to “EXTFSK”. Then go to the MISC tab and choose Com-TxD(FSK). Click OK, and a pop-up screen will ask you for the radio number, and choose Radio 2. Also, uncheck the box that says “Ask Every Time”.
  10. Without closing either Digital Interface, close N1MMLogger, then reopen it. If configured correctly, both Digital Interfaces should open, and no pop-up boxes should be displayed.
  11. If your FSK signal is inverted, check the setup for your radio. You may be able to invert it at your radio. If this doesn’t work, close N1MM Logger and the SO2R Box Interface, open up the SO2R Box Utility, and check “Invert Radio x” where “X” is your radio number. close the Utility and try again.